Migrating
data from cloud into on-premises is always on priority of every organization.
Data requires for multiple purposes like reporting, cleaning, archiving etc.
One of the reason of data migration or synchronization on and off the cloud is
its storage limitation as we know we cannot create huge databases on SQL Azure
during trail version and even we have to pay after purchasing that is obviously
not too costly but still we need to move our archived data from the cloud DBs
to local Database.
Let discuss how can create synchronization using SQL Azure cloud and make connected to our on-premises database.


You can use your windows auth and SQL user auth to connect local db.Review Agent status on cloud on refresh
Add a SQL Azure Hub Database


Another scenario of data synchronization is at
enterprise applications there are multiple offices on multiple locations and we
need on-premises data to calculate reporting in easy and efficient way. Lets
look at the basic architecture of azure sync.
 |
| Azure Sync Portal |
SQL Data Sync comprises four main components:
- · SQL Data Sync service
- · Windows Azure SQL Database
- · Windows Azure Storage
- · Data Sync Agent
Let discuss how can create synchronization using SQL Azure cloud and make connected to our on-premises database.
Basic idea
behind this is to merge azure and local data on defined rules. We need to
create a Database hub to synchronize
data and then distribute it to data Members
or spoke. To do this we need
following steps
Provision a Data Sync Server
Before you can begin the process to create a sync group you
must first provision a Data Sync server on your Windows Azure subscription.
Create SQL Agent
 |
| List Shows available databases |
 |
| Click on create Sync Agent and follow Wizard |
Generate Key
 |
| Unique key has been generated to Link up your Azure DBs with Local service |
Download and Install SQL Data sync Agent Preview on your local machine

 |
| Key generated above used to connect to Azure |
 |
| Copy --> Paste key and click OK |
 |
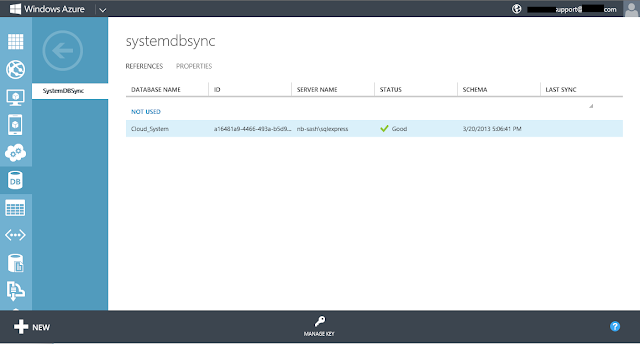
| Register your local database that is used to sync with SQL Azure Db. |
You can use your windows auth and SQL user auth to connect local db.Review Agent status on cloud on refresh
 |
| Local db has been synchronized and status is Good |
Create the Sync Group
The first step in the process to create a sync
group is to give the sync group a unique and meaningful name. |
| Use your closet Region |
- Hub Wins: The first row change written to the hub is kept. Subsequent attempts to write to the same row in the hub are ignored. The first write to the hub is propagated out to all member databases.
- Client Wins: Each row change in a member database is written to the hub, overwriting prior changes to the same row. The last write to the hub is then propagated out to all member databases.
No matter which policy you adopt, one
of the changed rows is kept and the others are lost whenever a
Conflict arises. |
| You can use one of your database as Hub and Can add one or multiple as Reference. |
 |
| Hub DB call sync service with local setting. If will copy all Reference tables in Hub db on Back end |
Add a SQL Azure Member or Reference Database
 |
| Select one of the database that use sync service to sync data. It would be Client to Hub, Hub to Client or Bi-directional |
 |
| We have successfully configured sync databases |
Configure the Sync Group
 |
| Select the sync group schema source |
Creating
rule for synchronize.
Set
the synchronization frequency.

Select the tables to synchronize.
Select the columns to synchronize.
Optionally filter the rows to synchronize.
Optionally filter the rows to synchronize.

1. You can also select all tables and
all columns but there are some restrictions applied as follows
I. Maximum number of SQL Data Sync
Servers per subscription: 1
II. Maximum number of sync groups any
database can belong to: 5
III. Filters per table: Up to 12
(optionally 13 if one is on the primary key column)
IV. Database, table, schema, and column names:
50 characters per name
V. Tables in a sync group: 100
VI. Columns
in a table in a sync group: 1000

Added reference tables to Sync Database
Along with the data tables
(HumanResources.Employee and Person.BusinessEntity), SQL Data Sync created six
new tables, system synchronization
tables, in both databases:
• schema_info: Tracks member
schema information.
• scope_config / scope_info: Used
by the Sync Framework to determine what tables, filters, and so on are being
synchronized. Each database that is participating in a sync includes these tables
and includes at least one scope (if they’re being synchronized).
• <table>_dss_tracking: Tracks
changes to the related user table.
• provision_marker:
A metadata table used internally as part of the change-tracking mechanism.
Now we have successfully configured our sync environment. Lets test how it works
Deploy Sync Group and Verify Changes
We have same data on both databases.
 |
| Large Query window returning result from local whereas Small Query tab showing data from Cloud. Data is same. |
Adding 2 new rows on the local database we have different
numbers on both sides.
 |
| After adding 2 rows on local db Count is changed from 28 to 30 whereas on cloud query tab count is still 28 |
Now
execute the sync service on cloud. For testing I do not wait frequency to execute
sync

Now
look at the data on both sides’ data has been synchronized on both databases.
 |
| After executing service data is synced and equal on both sides. |
As we have configured our reference database as bi-directional. Lets go to the cloud db and verify what happens when there is data change in cloud db. I have deleted some rows on cloud db and look at the total rows difference on both sides now.

 |
After
running sync service data has been updated on both sides.
|
Debugging the Logs

We have configured and test changes to sync data on Azure. Hope you will get benefit out of this post.
5 comments:
Thanks for your informative blog!!! Keep on updating yours with such awesome information.
Microsoft Azure Online Training
Thanks for your informative blog!Keep on updating yours with such beautiful information.
Full Stack Training in Chennai | Certification | Online Training Course| Full Stack Training in Bangalore | Certification | Online Training Course | Full Stack Training in Hyderabad | Certification | Online Training Course | Full Stack Developer Training in Chennai | Mean Stack Developer Training in Chennai | Full Stack Training | Certification | Full Stack Online Training Course
Damien Grant
Damien Grant
Damien Grant
Damien Grant
Damien Grant
Damien Grant
Damien Grant
Damien Grant
Damien Grant
Damien Grant
Damien Grant
Damien Grant
Damien Grant
Damien Grant
Damien Grant
Damien Grant
Thanks for sharing such a wonderful post.
SQL Classes in Pune
Post a Comment